Linux Unix help !!

"Give respect to Time, One day at right Time, Time will respect You"

Friday, September 16, 2016

Setup SUSE Local Repository

Description: There are many situation where internet access not available on server and it's being required to install packages as need with dependencies. The solution is simple to create local repository and publish to servers within network .

Here below are simple minimal steps required to setup a local repository on SUSE operating system 

Steps :
1. Mount iso/dvd
mount /dev/cdrom/ /mnt

2. Disable all existing repos
zypper mr  -d -a

3. Set enable DVD repo temporary 
zypper ar dir:///mnt/ OpensuseDVD

4. Install createrepo
zypper -n install createrepo

5. Install apache
zypper -n install apache2

6. Copy rpms
mkdir -p /srv/www/myrepo/Suse13
rsync -avp /mnt/suse/ /srv/www/myrepo/Suse13/

#copy gpg keys
cp -rp /mnt/gpg-pubkey-* /srv/www/myrepo/Suse13/

7. Create apache config for repo
# cat /etc/apache2/conf.d/mrepo.conf
Alias /repo /srv/www/myrepo/
<Directory /srv/www/myrepo/>
        Options Indexes FollowSymlinks SymLinksifOwnerMatch IncludesNOEXEC
        IndexOptions NameWidth=* DescriptionWidth=*
          AllowOverride None
          Order deny,allow
          Allow from all
</Directory>

8. Restart/reload enable apache2
rcapache2 start
chkconfig -a apache2

9. Createrepo "It will take bit time .."
createrepo -v /srv/www/myrepo/Suse13/

Spawning worker 0 with 5187 pkgs
        Workers Finished
Gathering worker results

Saving Primary metadata
Saving file lists metadata
Saving other metadata
Generating sqlite DBs
Sqlite DBs complete

#Validate 
ls -l /srv/www/myrepo/Suse13/repodata/

10. Add Repo (ar)
#zypper addrepo -t <repository type> <path> <repository name>
zypper addrepo -t YUM http://192.168.8.110/repo/Suse13/  SLES13.2

# Test "First time run ask to assign repo metadata"
zypper se test

File 'repomd.xml' from repository 'SLES13.2' is unsigned, continue? [yes/no] (no): yes
Building repository 'SLES13.2' cache ......................
...

#Change priority  
zypper mr -p 1 SUSE13.2

#Verify 
zypper lr SUSE13.2

#Validate repo config file
vi  /etc/zypp/repos.d/SLES13.2.repo

[SUSE13.2]
name=SLES13.2
baseurl=http://192.168.8.110/repo/Suse13/
enabled=1
autorefresh=0
type=rpm-md
priority=1   # 0-99, 0 -higher
#Added below this line gpg keys
gpgcheck=1       
gpgkey=http://192.168.8.110/repo/Suse13/gpg-pubkey-3dbdc284-4be1884d.asc,http://192.168.8.110/repo/Suse13/gpg-pubkey-307e3d54-4be01a65.asc

11. View repositry detials 
# zypper lr SUSE13.2
Alias          : SUSE13.2
Name           : SLES13.2
URI            : http://192.168.8.110/repo/Suse13/
Enabled        : Yes
Priority       : 1
Auto-refresh   : Off
Keep Packages  : Off
Type           : rpm-md
GPG Check      : On
GPG Key URI    : http://192.168.8.110/repo/Suse13/gpg-pubkey-3dbdc284-4be1884d.asc,http://192.168.8.110/repo/Suse13/gpg-pubkey-307e3d54-4be01a65.asc
Path Prefix    :
Parent Service :
MD Cache Path  : /var/cache/zypp/raw/SUSE13.2

12. Install a package
zypper install  nmap


Keyword/TAG: SUSE 13.2, Local, Repository, http, apache2

Friday, September 20, 2013

System Authentication via LDAP server

Getting Linux to authenticate via LDAP

Today various modes are there to authenticate system devices such as AD(Microsoft active directory) and AAA but LDAP (Light weight directory access protocol) is kind of protocol have it's unique place which use it's own database to authenticate various services applications such as mail, squid, samba, webpages servers and various network devices .

Here we are going to configure ldap server and Linux (centOs 5.7) client for user authentication from LDAP server .
 
These steps help you to configure Ldap server to act as centralized authentication server for your Linux/Unix servers .


Eg:
Server: server.shirish.com (192.168.8.10)
Client :  client.shirish.com (192.168.8.20)


Prerequisite : 

 1. Proper communication and required ports opens between client and server (default ports : 389 and ssh 22 )
2. Assuming you have proper DNS resolver 
3. Yum server configured to install necessary packages .

Do following seps at LDAP server: server.shirish.com end

Steps:

1. Installing Openldap on Linux server (ie.LDAP server)
Login to server : server.shirish.com as root and install following packages .

Required Packages to be installed .
openldap
openldap-clients
openldap-devel
openldap-servers
nss_ldap
 
[root@server1 ~]# yum -y install openldap*
Loaded plugins: fastestmirror
Loading mirror speeds from cached hostfile
Setting up Install Process
Package openldap-2.3.43-12.el5_6.7.i386 already installed and latest version
Resolving Dependencies
--> Running transaction check
---> Package openldap-clients.i386 0:2.3.43-12.el5_6.7 set to be updated
---> Package openldap-devel.i386 0:2.3.43-12.el5_6.7 set to be updated
--> Processing Dependency: cyrus-sasl-devel >= 2.1 for package: openldap-devel
---> Package openldap-servers.i386 0:2.3.43-12.el5_6.7 set to be updated
.
.
[root@server1 CentOS]# cd /etc/openldap/
[root@server1 openldap]# pwd
/etc/openldap
[root@server1 openldap]#
[root@server1 openldap]# ls -lrt
total 28
-rw-r----- 1 root ldap  921 Mar 31  2011 DB_CONFIG.example
-rw-r----- 1 root ldap 3799 Mar 31  2011 slapd.conf
-rw-r--r-- 1 root root  246 Mar 31  2011 ldap.conf
drwxr-xr-x 2 root root 4096 Mar 31  2011 cacerts
drwxr-xr-x 3 root root 4096 Aug 17 12:05 schema
[root@server1 openldap]#

2. Create Password for LDAP admin 
have to copy this encrypted password in slapd.conf file)

[root@server1 openldap]# slappasswd
New password:
Re-enter new password:
{SSHA}p+IMM8pNWzGirnHTizlpc2IwSrc6rgXR
 
[root@server1 openldap]#

3.Now add/change following lines in your /etc/openldap/slapd.conf file .

include         /etc/openldap/schema/core.schema
include         /etc/openldap/schema/cosine.schema
include         /etc/openldap/schema/inetorgperson.schema
include         /etc/openldap/schema/nis.schema
include         /etc/openldap/schema/redhat/autofs.schema
allow bind_v2
pidfile         /var/run/openldap/slapd.pid
argsfile        /var/run/openldap/slapd.args
database        bdb
suffix          "dc=shirishlinux,dc=com"
rootdn          "cn=admin,dc=shirishlinux,dc=com"
password-hash {CRYPT}
rootpw
{SSHA}p+IMM8pNWzGirnHTizlpc2IwSrc6rgXR
directory       /var/lib/ldap
index objectClass                       eq,pres
index ou,cn,mail,surname,givenname      eq,pres,sub
index uidNumber,gidNumber,loginShell    eq,pres
index uid,memberUid                     eq,pres,sub
index nisMapName,nisMapEntry            eq,pres,sub


Verify above your changes by ..

[root@server1 openldap]# egrep -v "^#|^$" /etc/openldap/slapd.conf

3. Now copy /etc/openldap/DB_CONFIG.example  file to /var/lib/ldap/DB_CONFIG directory 

[root@server1 openldap]# cd /etc/openldap/
[root@server1 openldap]# cp -rp DB_CONFIG.example /var/lib/ldap/DB_CONFIG
[root@server1 openldap]# ls -ld /var/lib/ldap/ <-- Make sure your ldap directory permission .
drwx------ 2 ldap ldap 4096 Aug 17 12:22 /var/lib/ldap/
[root@server1 openldap]# ls -ld /var/lib/ldap/DB_CONFIG
-rw-r----- 1 root ldap 921 Mar 31  2011 /var/lib/ldap/DB_CONFIG

[root@server1 openldap]#
[root@server1 openldap]# chown ldap:ldap /var/lib/ldap/DB_CONFIG
[root@server1 openldap]# chmod 600 /var/lib/ldap/DB_CONFIG 
 
Now start ldap service 
[root@server1 openldap]# /etc/init.d/ldap start
Checking configuration files for slapd:  config file testing succeeded
                                                           [  OK  ]
Starting slapd:                                            [  OK  ]
[root@server1 openldap]#
 
 
Now we have to create base schema to understand our domain communicate input and request t ldap server .
 
There are various way to create it, but easiest way which admin prefer is migrate scripts available at path "/usr/share/openldap/migration"
 
 
[root@server1 openldap]# cd /usr/share/openldap/migration
[root@server1 migration]# ls -rlt migrate_common.ph
-rw-r--r-- 1 root root 8880 Mar 31  2011 migrate_common.ph

Take backup of this script .
[root@server1 migration]# cp -rp migrate_common.ph migrate_common.ph_back

This script is made for domain "padl.com" which now we have to change for our "shirishlinux.com" domain as below before running this script .

[root@server1 migration]# grep -i padl  migrate_common.ph
$DEFAULT_MAIL_DOMAIN = "padl.com";
$DEFAULT_BASE = "dc=padl,dc=com";
#define(`confLDAP_DEFAULT_SPEC',`-h "ldap.padl.com"')dnl
# $DEFAULT_MAIL_HOST = "mail.padl.com";
[root@server1 migration]#


We will do this changes by sed, but you can do by opening file via "vi" editor too .
First check :

[root@server1 migration]# sed   "s/padl/shirishlinux/g" migrate_common.ph | grep -i shirish
$DEFAULT_MAIL_DOMAIN = "shirishlinux.com";
$DEFAULT_BASE = "dc=shirishlinux,dc=com";
#define(`confLDAP_DEFAULT_SPEC',`-h "ldap.shirishlinux.com"')dnl
# $DEFAULT_MAIL_HOST = "mail.shirishlinux.com";
[root@server1 migration]#


Above seems okay, now will implement changes using sed as below .

[root@server1 migration]# sed -i  "s/padl/shirishlinux/g" migrate_common.ph

Verify Now ....
[root@server1 migration]# grep -i shirishlinux migrate_common.ph
$DEFAULT_MAIL_DOMAIN = "shirishlinux.com";
$DEFAULT_BASE = "dc=shirishlinux,dc=com";
#define(`confLDAP_DEFAULT_SPEC',`-h "ldap.shirishlinux.com"')dnl
# $DEFAULT_MAIL_HOST = "mail.shirishlinux.com";
[root@server1 migration]#


The above seems fine, as per our requirement .
Now we will create structure base schema for ldap database using this script as below .
 
[root@server1 migration]# mkdir /root/LDAP
[root@server1 migration]# ./migrate_base.pl > /root/LDAP/base.ldif
 
Now just look ad base.ldif schema file, will get bit idea about it by looking at various fields of this .
 
[root@server1 migration]# cat /root/LDAP/base.ldif
dn: dc=shirishlinux,dc=com
dc: shirishlinux
objectClass: top
objectClass: domain


dn: ou=Hosts,dc=shirishlinux,dc=com
ou: Hosts
objectClass: top
objectClass: organizationalUnit


dn: ou=Rpc,dc=shirishlinux,dc=com
ou: Rpc
objectClass: top
objectClass: organizationalUnit


dn: ou=Services,dc=shirishlinux,dc=com
ou: Services
objectClass: top
objectClass: organizationalUnit


dn: nisMapName=netgroup.byuser,dc=shirishlinux,dc=com
nismapname: netgroup.byuser
objectClass: top
objectClass: nisMap


dn: ou=Mounts,dc=shirishlinux,dc=com
ou: Mounts
objectClass: top
objectClass: organizationalUnit


dn: ou=Networks,dc=shirishlinux,dc=com
ou: Networks
objectClass: top
objectClass: organizationalUnit


dn: ou=People,dc=shirishlinux,dc=com
ou: People
objectClass: top
objectClass: organizationalUnit


dn: ou=Group,dc=shirishlinux,dc=com
ou: Group
objectClass: top
objectClass: organizationalUnit


dn: ou=Netgroup,dc=shirishlinux,dc=com
ou: Netgroup
objectClass: top
objectClass: organizationalUnit


dn: ou=Protocols,dc=shirishlinux,dc=com
ou: Protocols
objectClass: top
objectClass: organizationalUnit


dn: ou=Aliases,dc=shirishlinux,dc=com
ou: Aliases
objectClass: top
objectClass: organizationalUnit


dn: nisMapName=netgroup.byhost,dc=shirishlinux,dc=com
nismapname: netgroup.byhost
objectClass: top
objectClass: nisMap

 
Now we will add this ldif file to LDAP database by using ldapadd command .

Here..
-X   Authzid SASL authorization identity ("dn:<dn>" or "u:<user>")
-x   Simple authentication
-W  Prompt for bind password
-D   Binddn bind DN
-f    File read operations from `file'


[root@server1 migration]# ldapadd -x -D "cn=admin,dc=shirishlinux,dc=com" -W -f /root/LDAP/base.ldif
Enter LDAP Password:
adding new entry "dc=shirishlinux,dc=com"

adding new entry "ou=Hosts,dc=shirishlinux,dc=com"
adding new entry "ou=Rpc,dc=shirishlinux,dc=com"
adding new entry "ou=Services,dc=shirishlinux,dc=com"
adding new entry "nisMapName=netgroup.byuser,dc=shirishlinux,dc=com"
adding new entry "ou=Mounts,dc=shirishlinux,dc=com"
adding new entry "ou=Networks,dc=shirishlinux,dc=com"
adding new entry "ou=People,dc=shirishlinux,dc=com"
adding new entry "ou=Group,dc=shirishlinux,dc=com"
adding new entry "ou=Netgroup,dc=shirishlinux,dc=com"
adding new entry "ou=Protocols,dc=shirishlinux,dc=com"
adding new entry "ou=Aliases,dc=shirishlinux,dc=com"
adding new entry "nisMapName=netgroup.byhost,dc=shirishlinux,dc=com"
[root@server1 migration]#

Now it's time to create user and add same in ldap database .
1. Create a normal user on ldap server say ldapuser

[root@server1 migration]# useradd ldapuser
[root@server1 migration]# passwd ldapuser
Changing password for user ldapuser.
New UNIX password:
BAD PASSWORD: it is WAY too short
Retype new UNIX password:
passwd: all authentication tokens updated successfully.
[root@server1 migration]#


[root@server1 migration]# getent  passwd ldapuser
ldapuser:x:505:506::/home/ldapuser:/bin/bash
[root@server1 migration]#

/usr/share/openldap/migration/migrate_passwd.pl
[root@server1 migration]# grep -i ldapuser /etc/passwdldapuser:x:505:506::/home/ldapuser:/bin/bash
[root@server1 migration]#


[root@server1 migration]# grep  -i ldapuser /etc/passwd > /root/LDAP/ldapuser_u

Note: Here we are using default home for user, but problem is when user with same name exit's on client server, so it's better to avoid such situation .
Later in this blog will see how to export NFS home directory for each user, which get's auto  mounted upon user login .

Now migrate this ldif file with migration script"
/usr/share/openldap/migration/migrate_passwd.pl" as below .

[root@server1 migration]# /usr/share/openldap/migration/migrate_passwd.pl   /root/LDAP/ldapuser_u /root/LDAP/ldapuser_u.ldif
[root@server1 migration]#


[root@server1 migration]# cat /root/LDAP/ldapuser_u.ldif
dn: uid=ldapuser,ou=People,dc=shirishlinux,dc=com
uid: ldapuser
cn: ldapuser
objectClass: account
objectClass: posixAccount
objectClass: top
objectClass: shadowAccount
userPassword: {crypt}$1$DxsQboOW$m56cO.1e/LDOaWznHD3ll/
shadowLastChange: 15968
shadowMin: 0
shadowMax: 99999
shadowWarning: 7
loginShell: /bin/bash
uidNumber: 505
gidNumber: 506
homeDirectory: /home/ldapuser

[root@server1 migration]#


Similarly we will do for group file entry as below of the user "ldapuser"

[root@server1 migration]# grep -i ldapuser /etc/group > /root/LDAP/ldapuser_g
[root@server1 migration]# cat /root/LDAP/ldapuser_g
ldapuser:x:506:
[root@server1 migration]#

[root@server1 migration]# /usr/share/openldap/migration/migrate_group.pl /root/LDAP/ldapuser_g /root/LDAP/ldapuser_g.ldif
[root@server1 migration]#

[root@server1 migration]# cat /root/LDAP/ldapuser_g.ldif
dn: cn=ldapuser,ou=Group,dc=shirishlinux,dc=com
objectClass: posixGroup
objectClass: top
cn: ldapuser
userPassword: {crypt}x
gidNumber: 506


Now we will add this ldif file too to ldap database, similarly as we did for base.ldif file as below .

[root@server1 migration]# ldapadd -x -D "cn=admin,dc=shirishlinux,dc=com" -W -f  /root/LDAP/ldapuser_u.ldif
Enter LDAP Password:
adding new entry "uid=ldapuser,ou=People,dc=shirishlinux,dc=com"

[root@server1 migration]# ldapadd -x -D "cn=admin,dc=shirishlinux,dc=com" -W -f  /root/LDAP/ldapuser_g.ldif
Enter LDAP Password:
adding new entry "cn=ldapuser,ou=Group,dc=shirishlinux,dc=com"

[root@server1 migration]#


Now will verify our above entry in ldap database using ldapsearch command

[root@server1 migration]# ldapsearch -x -b 'dc=shirishlinux,dc=com' '(cn=ldapuser)'
# extended LDIF
#
# LDAPv3
# base <dc=shirishlinux,dc=com> with scope subtree
# filter: (cn=ldapuser)
# requesting: ALL
#

# ldapuser, People, shirishlinux.com
dn: uid=ldapuser,ou=People,dc=shirishlinux,dc=com
uid: ldapuser
cn: ldapuser
objectClass: account
objectClass: posixAccount
objectClass: top
objectClass: shadowAccount
userPassword:: e2NyeXB0fSQxJER4c1Fib09XJG01NmNPLjFlL0xET2FXem5IRDNsbC8=
shadowLastChange: 15968
shadowMin: 0
shadowMax: 99999
shadowWarning: 7
loginShell: /bin/bash
uidNumber: 505
gidNumber: 506
homeDirectory: /home/ldapuser

# ldapuser, Group, shirishlinux.com
dn: cn=ldapuser,ou=Group,dc=shirishlinux,dc=com
objectClass: posixGroup
objectClass: top
cn: ldapuser
userPassword:: e2NyeXB0fXg=
gidNumber: 506

# search result
search: 2
result: 0 Success

# numResponses: 3
# numEntries: 2
[root@server1 migration]#


Now we have done with ldap server end.. now at client server: client.shirish.com

Note: here am doing each communication via IP address, you can do using either ip/hostname which you prefer, but ensure hostname is getting resolve by your DNS server or have proper entry in /etc/hosts file .

Now will configure client server for the login authentication from our ldap server : server.shirish.com(192.168.8.10)

Install required packages using yum .


[root@server2 ~]# yum -y install openldap  openldap-clients openldap-devel nss_ldap


CLI way: manually add/modify /etc/ldap.conf with below entries

base dc=shirishlinux,dc=com
uri ldap://192.168.8.10/
 
Add/Modify  /etc/nsswitch.conf  with below entries  

passwd:     files ldap
shadow:     files ldap
group:      files ldap
netgroup:   nisplus ldap 


GUI_WAY: Run authconfig-tui from CLI as below .

[root@client ~]# authconfig-tui


[root@server2 ~]# id ldapuser
uid=505(ldapuser) gid=506(ldapuser) groups=506(ldapuser)
[root@server2 ~]#


Good Congratulation!!!  :) now user : ldapuser is logged in on client system.
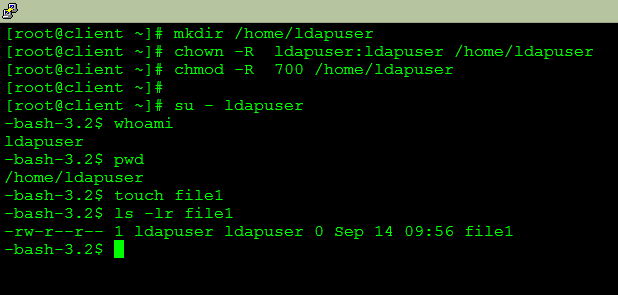
BUT 1. Here user is not able to create any file and does not have any home directory for him .


So we will create home for user and try again login .
  

Great wow, it works... but ..but .. what if there are 1000 servers and 100 users, it will be tough task for admin to perform such steps for all users on all servers ..
Here below are solutions for same .


1. NFS shared home for each user, which will get auto mounted upon login
2. Upon user login, his home directory and other files get auto created locally on respective servers .
 

Above I will cover in coming blog .. keep learning .. have a great day .

--Shirish Shukla


ldap, ldap based authentication, ldap schema for user authentication, linux ldap authentication, nfs auto mount home directory, ldap autofs home directory and authentication, linux, linuxva, shirish, shukla

Script to print partition utilization - HP-UX

In HP-UX admin always want to have disk utilization output in Linux native format as "df- h"

Here the small script which format and give bdf output as "df -h"

In HP-UX, the bdf command display partition details in KB, so here's script that will display partition details in MB .

# vi bdff

################################
# Shirish Shukla
# Script to print partition utilization
################################
# Script to print Disk UTIL
if [ -z "$1" ]
then
df -Pk |egrep -v "Filesystem" | awk 'BEGIN { print "  -Filesystem-\t\t -Total(MB)-\t-used(MB)-\t-avail(MB)-   -%used-\t-Mounted on-"}  {print "  " $1 "   \t " $2/1024 " \t" $3/1024 "    \t" $4/1024 "  \t" $5 "  \t" $6 }'
else
   a=$1
df -Pk |egrep -v "Filesystem" | awk 'BEGIN { print "  -Filesystem-\t\t -Total(MB)-\t-used(MB)-\t-avail(MB)-   -%used-\t-Mounted on-"}  {print "  " $1 "   \t " $2/1024 " \t" $3/1024 "   \t" $4/1024 "  \t" $5 "  \t" $6 }' | egrep -i "filesystem|$a"
fi


# chmod 755 bdff 
# mv  bdff   /usr/bin/bdff

# bdff

Monday, May 14, 2012

Create filesystem in a partition

One of my application creates un-necessary logs or dumps that fills my filesystem .
Say example I have only root partition "/" and other filesystems(/var/, /usr etc..) are in "/" .
Sometime one of my application creates lots of files and unwaned logs at path /var/log/mycore and that fills my root partition and my oher application stops working .

I want to give a permanent solution, but I have some limitations as below
- I don't have extra free disk block to create new partition
- I can't add any any new disk/LUN etc .
- I can't stop that application logging etc...

Here's solution that have applied on one of my server and it's working as am expected .

## Example
# df -h  /
Filesystem            Size  Used Avail Use% Mounted on
/dev/sda3              72G   57G   12G  79% /

## I have 12 GB free space now check size of dir: /var/log/mycore
# du -sch /var/log/mycore
2G     /var/log/mycore
2G     total

## Okay now we have 2 way
1> Define quota .. but not preferred .
2> Create a filesystem with allocated space

## Am preferring to go with way-2 as below
As have 12G free space on "/", so I will allocate 3GB to /var/log/mycore as below

Step-1: Create a file usign dd with size 3GB
# dd  if=/dev/zero of=/var/log/FS_mycore bs=1024M count=3

Step-2: Create file system as per your requirement here am going with ext4
# mkfs.ext4  /var/log/FS_mycore

Step-3: Stop your application

Step-4:  Move /var/log/mycore  and create a new directory (Note: Reserve the permissions as original dir has)
# mv /var/log/mycore  /var/log/mycore_old
# mkdir  /var/log/mycore

Step-5: Mount and copy back all files and delete /var/log/mycore_old
# mount  -o loop  /var/log/FS_mycore  /var/log/mycore
# mount  -l


# df -h  /var/log/mycore/
Filesystem            Size  Used Avail Use% Mounted on
/var/log/FS_mycore    3.0G   68M  2.8G   2% /var/log/mycore/

# cp -rp  /var/log/mycore_old/* /var/log/mycore/

# cd  /var/log/mycore/ ; ls -lrth
# rm -fr  /var/log/mycore_old/

## Make entry in fstab
/var/log/mycore_old     /var/log/mycore         ext4    defaults,loop        0 0


##  Testing
# umount  /var/log/FS_mycore # mount -a
# mount -l 

## Step-6: Don't forget to start your application and check logs and all to verify all are okay ...


> Shirish Shukla

Diff file1 file2


Many time we come across situation that we want exact diff between two files ..
There are various Linux command which we can use like

# diff
# cmp

EG:
# cat  1
1
2
3
4
5
6
# cat  2
2
3
6
7
8

### Using diff
# diff -iw 1 2
1d0
< 1
4,5d2
< 4
< 5
6a4,5
> 7
> 8


Expln:
1d0< 1
- Add "1" at line 1 of file 2
4,5d2
< 4
< 5

- Add  "4" at line 4 of file 2
- Add  "5" at line 5 of file 2
6a4,5
> 7
> 8

- Add  "7" at line 7 of file 2
- Add  "8" at line 8 of file 2

-- Actual count as line 0 - N


Here it's tough to found whats mean of above if you are using it first time, What we expect is I want only those line which are missing in file 2 .

So have written a small PerlScript to achieve so, it's possible with BashScript too, but to parse a large file BashScript will take more time .


Script : diff.pl

#!/usr/bin/perl
# Written By - Shirish
#### perl  diff.pl file1 file2  OUTPUT
#### Will give you exact diff between file1 and file2 in OUTPUT file
##### Only lines that are in file1 but missing in file2
#################
#open a, "<filea";
#open b, "<fileb";
$x = $ARGV[0];
$y = $ARGV[1];
$z = $ARGV[2];
open a, "< $x";
open b, "< $y";
open (OP, ">$z") || die ("Unable to create Report");
local $/;
my @a = split /\n/, <a>;
my @b = split /\n/, <b>;
my %b = map { $_ => 1 } @b; # Make hash of B
my @res = grep { !defined $b{$_} } @a; # Everything in A not in B
print OP join "\n", @res;
#print join "\n", @res;
print "\n";

## How to use
## What's in file 1 which are absent in file 2
# perl diff.pl 1 2 1-2 
# cat 1-2
1
4
5

## What's in file 2 which are absent in file 1
# perl diff.pl 2 1 2-1
# cat 2-1
7
8


> Shirish Shukla


difference between two file linux, unix, find diff of two files, command diff, perl script to find diff of two files, compare two files, linux, linuxva, shirish, shukla

Tuesday, March 20, 2012

ConverT Shell Script to C - Binary [executable ]

Xxxxxxxxxxxxxx ConverT Shell Script to C - Binary [executable ] xxxxxxxxxxxxxxX

Hi many times we required to convert our script to be executable might be any of  below reasons .

- We don't want to share our script code
- We want to set suid, guid  that we can't do with shell scripts
- Want to run script without any extension as ./script.sh OR sh script.sh etc...

Here an fantastic toll that will hep you to achieve so .

Download & Install


Note: Install proper Linux/Unix flavor rpm and architecture else it will not going to work as expected

Download:
# cat /etc/redhat-release
Red Hat Enterprise Linux ES release 3 (Taroon)
# uname -i
i386

### So have downloaded right rpm for CentOS-6
# wget  http://pkgs.repoforge.org/shc/shc-3.8.6-1.el3.rf.i386.rpm

Install:
# cd   /rpms/shc/
# rpm -ivh shc-3.8.6-1.el3.rf.i386.rpm
warning: shc-3.8.6-1.el3.rf.i386.rpm: V3 DSA signature: NOKEY, key ID 6b8d79e6
Preparing...                ########################################### [100%]
   1:shc                    ########################################### [100%]


Write your script


AM taking example of   expire-date.sh

Convert to executable c binary
# cd  /myscripts; ls -lrt expire-date.sh
-rwxr-xr-x 1 root root 599 Mar 20 18:25 expire-date.sh

## Conver to exe using shc
# shc  -f  expire-date.sh
# gcc -o getexpiredt expire-pwd-date.sh.x.c
# mv getexpiredt  /bin/            <<-- As per your requirement

## Now test 
# file getexpiredt
getexpiredt: ELF 32-bit LSB executable, Intel 80386, version 1 (SYSV), for GNU/Linux 2.2.5, dynamically linked (uses shared libs), not stripped

## Execute
# getexpiredt
Enter Password Date [ DD:MM:YYYY EG: 25:02:2012] Format
                                                     DD: 01
                                                     MM: 02
                                                     YY: 2012
YOUR Password Will Expire on : Tue 1-May-2012
##

Have a fun ... Now remove your C code and sh code .
# rm -fr expire-pwd-date.sh*


--Shirish Shukla

convert shell script to c, c binary executable,shc -f cmd.sh command,linux, linuxva, shirish, shukla

Script to calculate Expiry Date

Xxxxxxxxxxxxxxxxxx Script To Calculate Your Expiry Date xxxxxxxxxxxxxxxX

Most of the time we require to calculate when my password/licence will expire ... this below for what i required by all users to calculate when there password get expire ..on unix ..

You need to provide input as DD : MM : YYYY .

File: expire-date.sh

#!/bin/bash
### Calculate Expire Date
### By- Shirish Shukla

############## Hardcoded
ExpireDays=90
Hours=00;Mins=00;Secs=0;zxone=IST
##############
echo -en "Enter Password Date [ DD:MM:YYYY EG: 25:02:2012] Format \n"
echo -en "\t\t\t\t\t\t     DD: " ; read dtys;
echo -en "\t\t\t\t\t\t     MM: " ; read mms;
echo -en "\t\t\t\t\t\t     YY: " ; read yys ;
############## Logic
EXPDT=$(date --date="$yys-$mms-$dtys $Hours:$Mins:$Secs $zxone + $ExpireDays days")
echo -en "\E[33m \n\nYOUR Password Will Expire on : " ; echo -en "\E[36m$EXPDT" | awk  '{print $1 " "$3 "-" $2 "-" $NF}'

echo -en "\e[0m\n"

## How to USE

# sh  expire-date.sh
Enter Password Date [ DD:MM:YYYY EG: 25:02:2012] Format
                                                     DD: 02
                                                     MM: 02
                                                     YY: 2012
YOUR Password Will Expire on : Wed 2-May-2012

Now I need to convert it into Binary Like I don;t want to Give same as to my users ... I can help you with this with my below Page ..


### Convert shell script to C binary .exe (executable)


--Shirish Shukla
script to calculate expiry date,bash script to find password expire date, convert shell script to c, c binary executable,shc -f cmd.sh command,linux, linuxva, shirish, shukla

Monday, March 12, 2012

HP-UX Basic Admin -3 - Software and imp log files

Xxxxxxxxxxxxxx HP-UX - Basic Administration - III  xxxxxxxxxxxxxxxxxxxxX
------------ Index -----------------
1> System Info
2> Basic Admins
3> Software and imp log files
4> Patching and Recovery          <Yet to update>
5> Backup and Tools                  <Yet to update>     
5> Advanced Administrations     <Yet to update>
------------------------------------


### Installed Softwares
# swlist -l product
# swlist -l patch
# swlist -l file
# swlist -l product | grep -i <ur-pack>

## verify package/patches
# swlist -l -a state
# swverify
# swlist -s   <path-of-your-pack>

### Install
# swinstall -s  <path-of-your-pack>
>>>> Select Package -> Go to Action > Install ...

## Varify is Installed
# swlist -l product | grep -i  <your-pack-name>


### Un-install
swremove
##

##### Important Files/log files etc..
### Log Files
# more  /var/adm/syslog/syslog.log
# more  /var/adm/syslog/mail.log
# more  /var/adm/cron/log
# more  /var/adm/syslog/syslog.log
# more /var/sam/log/samlog


--Shirish Shukla
hp-ux, hp unix, hp-ux basic admin commands, hp-ux getconf, hp-ux swinstall, software, log files , linux, linuxva, shirish, shukla

HP-UX Basic Admin -2 - Basic Admins

Xxxxxxxxxxxxxx HP-UX - Basic Administration - II  xxxxxxxxxxxxxxxxxxxxX
------------ Index -----------------
1> System Info
2> Basic Admins
3> Software and imp log files
4> Patching and Recovery          <Yet to update>
5> Backup and Tools                  <Yet to update>     
5> Advanced Administrations     <Yet to update>
------------------------------------


## Display Hostname
# hostname

## IP Address
# netstat -ani

## Disk Utilization
# bdf
# df -Pk

## Show run levels
# who -r
   .       run-level 3  Oct 28 11:22    3    0    S
[[ 0: shut down
s,S: single-user
1: sys admin
2: multiuser
3*: share NFS
4*: start GUI
5: user-defined
6: user-defined ]]

### Shutdown/Restart
<<HALT>>
# shutdown -h -y now  
# init 0                                          
# shutdown -hy 120    
# shutdown -h -y 120                   <<Shutdown in 120 sec>>
# shutdown -Fr now                     <Force fsck upon reboot SAFE way>

<<Reboot>>
# shutdown -r -y now 
# shutdown -r 0                              
# reboot 0

<<To shutdown to single user mod>>
# shutdown -y 0
# shutdown -y now
# shutdown 0
# init 1
# hpux -is
# init S
# reboot -h    <<Come from Single user Mode>>

### LAN IP Info
# lanscan        
# lanscan  -v   
# netstat -in   
# ifconfig lanx   [ x=0/1/2/....]

Note: lanscan is deprecated in 11.31 now can find  # nwmgr

### Assign/Display  IP
## GET
# ifconfig lan0
# netstat -ani  
#

## Set
# landiag          
# lanadmin              
# vi /etc/rc.config.d/netconf
HOSTNAME="Shirish"
INTERFACE_NAME[0]=lan0
IP_ADDRESS[0]=192.168.8.10
SUBNET_MASK[0]=255.255.255.0
BROADCAST_ADDRESS[0]=""
INTERFACE_STATE[0]=""
DHCP_ENABLE[0]=0
INTERFACE_MODULES[0]=""

##NOTE: Above required restart to take effects FOR immediate use below but note it's temp
# ifconfig lan3 192.168.8.10 netmask 255.255.255.0  up     

## Up network interface
# ifconfig lan3 up

## Down network interactive
# ifconfig lan3 down

## ARP/Routing Table info/Define new route
# arp -a
# netstat -ar
# route add default 192.168.8.1 1

## Start/Stop Network

/sbin/init.d/net stop; /sbin/init.d/net start
Note: There's NO restart option you have to stop; then start
WARNING: Pass both as single command as above else you will loose control of your server/system

### Hostname start/stop
# /sbin/init.d/hostname stop
/sbin/init.d/hostname start
   
## Set timezone
# vi /etc/TIMEZONE


--Shirish Shukla
hp-ux, hp unix, hp-ux basic admin commands, hp-ux getconf, linux, linuxva, shirish, shukla

HP-UX Basic Admin -1 - Sys Info

Xxxxxxxxxxxxxx HP-UX - Basic Administration - I xxxxxxxxxxxxxxxxxxxxX
------------ Index -----------------
1> System Info
2> Basic Admins
3> Software and imp log files
4> Patching and Recovery          <Yet to update>
5> Backup and Tools                  <Yet to update>     
5> Advanced Administrations     <Yet to update>
------------------------------------


## 64 or 32 bit ??
# getconf KERNEL_BITS
64

# file /stand/vmunix
/stand/vmunix:  ELF-64 executable object file - PA-RISC 2.0 (LP64)

# find / -name print_mani*
/opt/ignite/binpa/print_manifest
# /opt/ignite/binpa/./print_manifest | grep -i mod
    Model:              9000/800/L3000-8x
    OS mode:            64 bit

# getconf HW_CPU_SUPP_BITS
64

## Get detailed information about System
# find / -name print_mani*
/opt/ignite/binpa/print_manifest
# /opt/ignite/binpa/./print_manifest

## Get Model
# model
9000/800/L3000-7x
### Configuration files
# cd /etc/rc.config.d

### Your Kernel
# cd /stand/vmunix

### Display Kernel Paramiters
# kctune
# sysdef
# kmtune

## Get memory info
# /usr/sam/lbin/./getmem
# dmesg | grep -i Phy
# /opt/ignite/bin/print_manifest    <-- An detailed infor about your system

### All Kernel Parms and Hwrs
# /usr/sbin/sysdef or ioscan –fn

### Devices Messages
# dmesg

## Get System Serial Number
# echo "sel dev 1 ;info;wait;infolog" | cstm |grep -i "System Serial Number"
   System Serial Number...: SGH444039B

### Check swap space
# swapinfo
# swapinfo -m     <- IN MB
# swapinfo -tm    <- Disp Total Row


### Check attached Disk/devices/hws
# ioscan -funC disk
# ioscan -C disk
# ioscan -fnC lan
# ioscan -fnC tape   
# ioscan -fnC  lun

Here:
-u: Show usable devices i.e don;t rescan
-f: Full listing
-C: Show Class
-n: Device name

### Format a disk
# ioscan -funC disk
Class     I  H/W Path     Driver S/W State   H/W Type     Description
=====================================================================
disk      1  0/0/1/1.2.0  sdisk CLAIMED     DEVICE       HP 73.4GST373454LC
                         /dev/dsk/c1t2d0   /dev/rdsk/c1t2d0
..
..

# mediainit /dev/rdsk/c1t2d0

### Disk detailed info
# diskinfo -v /dev/rdsk/c1t2d0


--Shirish Shukla
hp-ux, hp unix, hp-ux basic admin commands, hp-ux getconf,hp-ux get 32 or 64 bit, disk info etc.., unix linux, linuxva, shirish, shukla

Sunday, March 11, 2012

backup using script imp files linux

Many time we come across situation to take a backup of file daily/weekly or sometime every hour .

Yes it may be that your filesystem are auto backuped by your backup tools as Snapshot/Veritas netbackup etc.. but still we always come across situation to that we want our some critical file (/etc/passwd, /etc/httpd/conf/httpd.conf etc..)  that had changed 1 hour back .

Below a small and simple script that can help us a way .. just schedule this in your crontab .. as per your requirement .

## MyBackup.sh
#!/bin/bash
#Shirish Shukla
#######################################
## Files to be backuped
Sources="/etc/passwd, /etc/group, /etc/shadow"
## Backup Save at Target:
Targetpath=/usr/Backup
#######################################
if [ ! -d $Target-path ]
then
    mkdir -p $Targetpath
fi
#######################################
create=`date +%a-%d-%b-%Y-AT:%H:%M`
delete=`date --date '1 month ago' +%a-%d-%b-%Y`
#######################################
for fles in `echo $Sources`
do
   fle=`echo $fles | sed  "s/,//g"`
    if [ ! -e $fle ]
    then
          echo "file: $fle not EXIST"
    fi
    lst=` echo $fle | awk -F"/" '{print $NF}'`
    tar -jcf $Targetpath/$lst-$create.bz2 $fle
done
#######################################
## Now delete 1 month old backups if exists any
rm -fr  $Targetpath/*$delete*
#######################################

## Check Backup
# ls -lrt  /usr/Backup/
-rw-r--r-- 1 root root 500 Feb 11 11:47 shadow-Sat-11-Feb-2012-AT:11:47.bz2
-rw-r--r-- 1 root root 938 Feb 11 11:47 passwd-Sat-11-Feb-2012-AT:11:47.bz2
-rw-r--r-- 1 root root 500 Feb 11 11:47 group-Sat-11-Feb-2012-AT:11:47.bz2


## Schedule crontab to take it 2 hour
# chmod 755 /root/MyBackup.sh
# crontab -e
01  */2 * * *  /root/MyBackup.sh


> Shirish Shukla

Wednesday, September 7, 2011

Monitor Your System Performance


Xxxxxxxxxxxxxxx Monitor Your System Performance xxxxxxxxxxxxxxxxxxxxX
[root@server ~]# uptime
 13:14:02 up  1:30,  2 users,  load average: 0.04, 0.26, 0.27

[root@server ~]# ps -eo %u | sort | uniq -c | sort -rn
     56 root
     22 nagios
      8 apache
      1 xfs
  
[root@server ~]# sar -c           ## Process/sec
Linux 2.6.18-164.el5 (server.scratch.com)       08/24/2011
11:50:01 AM    proc/s
12:00:01 PM      6.87
12:10:01 PM      6.90
12:20:01 PM      7.10
12:30:01 PM      6.77
12:40:01 PM      6.99
12:50:01 PM      6.85
01:00:01 PM      6.83
01:10:01 PM      6.92
Average:         6.90

[root@server ~]# sar -b   ## Data r/wr ps
Linux 2.6.18-164.el5 (server.scratch.com)       08/24/2011
11:50:01 AM       tps      rtps      wtps   bread/s   bwrtn/s
12:00:01 PM     24.81      0.18     24.63      6.37    376.94
12:10:01 PM     26.14      0.33     25.81     10.68    388.21
12:20:01 PM     57.68     28.05     29.63    620.21    466.02
12:30:01 PM     24.16      0.13     24.03      1.92    369.00
12:40:01 PM     24.55      0.10     24.44      1.70    374.73
12:50:01 PM     25.07      0.14     24.93      4.31    380.10
01:00:01 PM     24.95      0.58     24.37      6.20    377.88
01:10:01 PM     24.57      0.01     24.56      0.04    376.16
Average:        28.98      3.68     25.30     81.17    388.59

[root@server ~]# iostat -k
Linux 2.6.18-164.el5 (server.scratch.com)       08/24/2011

avg-cpu:  %user   %nice %system %iowait  %steal   %idle
           0.40    0.00    3.84    0.44    0.00   95.32

Device:            tps    kB_read/s    kB_wrtn/s    kB_read    kB_wrtn
sda               6.60        32.24        65.92     177987     363873
sda1              0.10         0.21         0.00       1163          5
sda2              6.50        32.01        65.92     176684     363868
dm-0             20.19        31.54        65.91     174109     363844
dm-1              0.02         0.08         0.00        440          0
dm-2              0.06         0.25         0.00       1397         20
dm-3              0.03         0.11         0.00        613          4

# cat /proc/stat
cpu  1864 0 16482 416939 2375 34 527 0
cpu0 1864 0 16482 416939 2375 34 527 0
intr 2416023 2368439 12 0 2 2 0 5 0 1 0 0 0 116 0 0 21 0 0 0 0 0 0 0 0 0 0 0 0 0 0 0 0 0 0 0 0 0 0 0 0 0 0 0 0 0 0 0 0 0 0 0 29989 0 0 0 0 0 0 0 37 0 0 0 0 0 0 0 17399 0 0 0 0 0 0 0 0 0 0 0 0 0 0 0 0 0 0 0 0 ctxt 258727
btime 1314166387
processes 32539
procs_running 1
procs_blocked 0

# cat /proc/meminfo
MemTotal:       218872 kB
MemFree:         36680 kB
Buffers:         40416 kB
Cached:          79080 kB
SwapCached:          0 kB
Active:         116728 kB
Inactive:        47320 kB
HighTotal:           0 kB
HighFree:            0 kB
LowTotal:       218872 kB
LowFree:         36680 kB
SwapTotal:      614384 kB
SwapFree:       614384 kB
Dirty:             460 kBWriteback:           0 kB
AnonPages:       44556 kB
Mapped:          15936 kB
Slab:            11628 kB
PageTables:       2320 kB
NFS_Unstable:        0 kB
Bounce:              0 kB
CommitLimit:    723820 kB
Committed_AS:   376900 kB
VmallocTotal:   802808 kB
VmallocUsed:      3564 kB
VmallocChunk:   798832 kB
HugePages_Total:     0
HugePages_Free:      0
HugePages_Rsvd:      0
Hugepagesize:     4096 kB

[root@server ~]# cat /proc/cpuinfo
processor       : 0
vendor_id       : GenuineIntel
cpu family      : 6
model           : 23
model name      : Pentium(R) Dual-Core  CPU      E5300  @ 2.60GHz
stepping        : 10
cpu MHz         : 2592.870
cache size      : 2048 KB
fdiv_bug        : no
hlt_bug         : no
f00f_bug        : no
coma_bug        : no
fpu             : yes
fpu_exception   : yes
cpuid level     : 13
wp              : yes
flags           : fpu vme de pse tsc msr pae mce cx8 apic mtrr pge mca cmov pat pse36 clflush dts acpi mmx fxsr sse sse2 ss constant_tsc up pni
bogomips        : 5185.74


[root@server ~]# cat /proc/buddyinfo
Node 0, zone      DMA     37     33     31     29     19     12      9      2      0      0      0
Node 0, zone   Normal   2217    861    467    317     71     17      6      1      1      0      0
[root@server ~]#

[root@server ~]# cat /proc/execdomains
0-0     Linux                   [kernel]

[root@server ~]# cat /proc/filesystems
nodev   sysfs
nodev   rootfs
nodev   bdev
nodev   proc
nodev   cpuset
nodev   binfmt_misc
nodev   debugfs
nodev   securityfs
nodev   sockfs
nodev   usbfs
nodev   pipefs
nodev   anon_inodefs
nodev   futexfs
nodev   tmpfs
nodev   inotifyfs
nodev   eventpollfs
nodev   devpts
        ext2
nodev   ramfs
nodev   hugetlbfs
        iso9660
nodev   mqueue
        ext3

[root@server ~]# cat /proc/loadavg
0.33 0.36 0.29 1/92 2916

[root@server ~]# cat /proc/locks
1: POSIX  ADVISORY  READ  2689 fd:00:320039 4 4
2: POSIX  ADVISORY  WRITE 2732 fd:00:931460 0 EOF
3: POSIX  ADVISORY  READ  2689 fd:00:320021 4 4

[root@server ~]# cat /proc/net/tcp
  sl  local_address rem_address   st tx_queue rx_queue tr tm->when retrnsmt   uid  timeout inode
   0: 00000000:0185 00000000:0000 0A 00000000:00000000 00:00000000 00000000     0        0 7642 1 c8adbb40 3000 0 0 2 -1
   1: 0100007F:0CEA 00000000:0000 0A 00000000:00000000 00:00000000 00000000    27        0 7887 1 c8adb240 3000 0 0 2 -1
   2: 00000000:008B 00000000:0000 0A 00000000:00000000 00:00000000 00000000     0        0 8138 1 c8ada4c0 3000 0 0 2 -1
   3: 00000000:006F 00000000:0000 0A 00000000:00000000 00:00000000 00000000     0        0 7482 1 c9720040 3000 0 0 2 -1
   4: 00000000:0015 00000000:0000 0A 00000000:00000000 00:00000000 00000000     0        0 7778 1 c8adb6c0 3000 0 0 2 -1

[root@server ~]# cat /proc/net/udp
  sl  local_address rem_address   st tx_queue rx_queue tr tm->when retrnsmt   uid  timeout inode
   9: 0A08A8C0:0089 00000000:0000 07 00000000:00000000 00:00000000 00000000     0        0 8108 2 c4db8d00
   9: 0908A8C0:0089 00000000:0000 07 00000000:00000000 00:00000000 00000000     0        0 8106 2 c4db32c0
   9: 0808A8C0:0089 00000000:0000 07 00000000:00000000 00:00000000 00000000     0        0 8104 2 c4db36c0
   9: 0708A8C0:0089 00000000:0000 07 00000000:00000000 00:00000000 00000000     0        0 8102 2 c4db3ac0
   9: 00000000:0089 00000000:0000 07 00000000:00000000 00:00000000 00000000     0        0 8099 2 c8a04080
[root@server ~]# cat /proc/net/protocols
protocol  size sockets  memory press maxhdr  slab module     cl co di ac io in de sh ss gs se re sp bi br ha uh gp em
RAWv6      648     -1      -1   NI       0   yes  ipv6        y  y  y  n  y  y  y  n  y  y  y  y  n  y  y  y  y  n  n
UDPv6      620     -1       0   NI       0   yes  ipv6        y  y  y  n  y  n  y  n  y  y  y  y  n  n  y  y  y  y  n
TCPv6     1248     19       1   no     224   yes  ipv6        y  y  y  y  y  y  y  y  y  y  y  y  n  n  y  y  y  y  y
PACKET     444     -1      -1   NI       0   no   kernel      n  n  n  n  n  n  n  n  n  n  n  n  n  n  n  n  n  n  n
UNIX       416     -1      -1   NI       0   yes  kernel      n  n  n  n  n  n  n  n  n  n  n  n  n  n  n  n  n  n  n
RAW        500     -1      -1   NI       0   yes  kernel      y  y  y  n  y  y  n  n  y  y  y  y  n  y  y  y  y  n  n
UDP        508     -1       0   NI       0   yes  kernel      y  y  y  n  y  n  y  n  y  y  y  y  y  n  y  y  y  y  n
TCP       1136     19       1   no     224   yes  kernel      y  y  y  y  y  y  y  y  y  y  y  y  n  n  y  y  y  y  y
NETLINK    404     -1      -1   NI       0   no   kernel      n  n  n  n  n  n  n  n  n  n  n  n  n  n  n  n  n  n  n

[root@server ~]# cat /proc/partitions
major minor  #blocks  name
   8     0   31457280 sda
   8     1     104391 sda1
   8     2   20860402 sda2
 253     0    7168000 dm-0
 253     1     512000 dm-1
 253     2    3891200 dm-2
 253     3    2048000 dm-3

[root@server ~]# cat /proc/schedstat
version 12
timestamp 2436227
cpu0 4336 4336 7 4343 7528 307075 58464 139144 139144 192048 1771799 248611
domain0 00000001 661081 661081 0 0 0 0 0 661081 360 360 0 0 0 0 0 360 58464 58464 0 0 0 0 0 58464 0 0 0 0 0 0 0 0 0 0 0 0

[root@server ~]# cat /proc/stat
cpu  2085 0 18967 484888 2403 42 607 0
cpu0 2085 0 18967 484888 2403 42 607 0
intr 2808623 2749553 12 0 2 2 0 5 0 1 0 0 0 116 0 0 21 0 0 0 0 0 0 0 0 0 0 0 0 0 0 0 0 0 0 0 0 0 0 0 0 0 0 0 0 0 0 0 0 0 0 0 33013 0 0 0 0 0 0 0 37 0 0 0 0 0 0 0 25861 0 0 0 0 0 0 0 0 0 0 0 0 0 0 0 0 0 0 0 0 0 0 0 0 0 0 0 0 0 0 0 0 0 0 0 0 0 0 0 0 0 0 0 0 0 0 0 0 0 0 0 0 0 0 0 0 0 0 0 0 0 0 0 0 0 0 0 0 0 0 0 0 0 0 0 0 0 0 0 0 0 0 0 0 0 0 0 0 0 0 0 0 0 0 0 0 0 0 0 0 0 0 0 0 0 0 0 0 0 0 0 0 0 0 0 0 0 0 0 0 0 0 0 0 0 0 0 0 0 0 0 0 0 0 0 0 0 0 0 0 0 0 0 0 0 0 0 0 0 0 0 0 0 0 0 0 0 0 0 0 0 0 0 0 0 0 0 0 0 0 0
ctxt 302029
btime 1314166387
processes 37438
procs_running 1
procs_blocked 0

[root@server ~]# cat /proc/swaps
Filename                                Type            Size    Used    Priority
/dev/mapper/MYVOL-SWAPer                partition       511992  0       -1
/extraswap                              file            102392  0       -2

[root@server ~]# cat /proc/scsi/scsi
Attached devices:
Host: scsi0 Channel: 00 Id: 00 Lun: 00
  Vendor: VMware,  Model: VMware Virtual S Rev: 1.0
  Type:   Direct-Access                    ANSI SCSI revision: 02
[root@server ~]# cat /proc/tty/drivers
/dev/tty             /dev/tty        5       0 system:/dev/tty
/dev/console         /dev/console    5       1 system:console
/dev/ptmx            /dev/ptmx       5       2 system
/dev/vc/0            /dev/vc/0       4       0 system:vtmaster
serial               /dev/ttyS       4 64-95 serial
pty_slave            /dev/pts      136 0-1048575 pty:slave
pty_master           /dev/ptm      128 0-1048575 pty:master
unknown              /dev/tty        4 1-63 console

[root@server ~]# cat /proc/uptime
5253.31 4967.57

[root@server ~]# cat /proc/version
Linux version 2.6.18-164.el5 (mockbuild@builder16.centos.org) (gcc version 4.1.2 20080704 (Red Hat 4.1.2-46)) #1 SMP Thu Sep 3 03:33:56 EDT 2009

Other that are usefulls :
[root@server ~]# cat /proc/interrupts
[root@server ~]# cat /proc/iomem
[root@server ~]# cat /proc/vmstat
[root@server ~]# vmstat -m

## Check NC status
[root@server ~]# mii-tool eth0


--Shirish Shukla

Followers

Pls LIKE my Story !!!